5 Photo Angles That’ll Step Up Your Real Estate Game
So you’ve decided to dive into the world of real estate photography—awesome choice! Whether you’re here because you love snapping photos or just want to up your real estate game, there’s one thing you’ve got to know: angles are *everything*. You can have the fanciest camera in the world, but if you’re not hitting those angles just right, you’re leaving potential buyers unimpressed. And we don’t want that, do we?
Real estate photography isn’t just about showing a house; it’s about creating a vibe. You’re helping people picture their dream life—morning coffee by the window, movie nights in the cozy living room, or summer barbecues in the backyard. It’s not just walls and furniture; it’s the *feels* you’re selling.
The cool thing? You don’t need to overcomplicate it. A few well-thought-out angles can make all the difference between “eh, next listing” and “we *have* to schedule a showing!” Think of it like this: your job is to give people a virtual tour that makes them say, “This is it. This is home.”
Whether it’s creating an illusion of space, highlighting charming details, or letting natural light work its magic, you’ve got the power to transform ordinary spaces into irresistible eye candy. Ready to make every shot count? Let’s do this!
Wide Angle Shots

Let’s talk about wide-angle shots—your secret weapon for making spaces look bigger and better than they actually are.
It’s not cheating; it’s showing potential buyers just how much potential the space really has. The trick is knowing where to stand and what to include in the frame. For starters, corners are your best friend. Standing in a corner lets you capture the whole room, from the furniture layout to the floor plan, giving viewers a complete picture.
In the living room? Show off the seating arrangement and how the space flows—people love imagining movie nights or lazy Sundays there. In the kitchen? Aim to get those shiny countertops, the sink, and even the dining area if it’s nearby. Kitchens are big decision-makers for buyers, so make them pop. And bedrooms? Make sure the bed looks cozy but also showcase how much room is around it, so potential buyers don’t feel like they’d have to crab-walk to get in.
One thing to watch out for: distortion. While wide-angle lenses are amazing, if you go overboard, you risk making everything look warped. Nobody wants a room that looks like it belongs in a funhouse. Keep it natural, and let the lens do just enough work to open up the space without stretching reality too much. The goal is to wow people, not confuse them!
Highlighting Unique Features
Every house has that little something special that makes it stand out, and it’s your job to make sure buyers can’t miss it.
Is there a gorgeous built-in bookshelf begging to be admired? Or maybe the home has a killer backsplash in the kitchen that screams personality. Whatever it is, zoom in and make it shine! You’re basically playing matchmaker here—introducing buyers to the details they didn’t know they were looking for.
The trick is to get creative with your angles. Don’t just snap a photo and call it a day. Try shooting slightly from the side to give depth or get up close to show off the textures and finishes. A shot of a beautifully tiled shower or a vintage doorknob can make someone fall in love with the little things.
And hey, don’t forget the quirky stuff! That funky spiral staircase or retro mid-century lighting fixture? Capture it like it’s the star of the show. These details are what give a house its personality, and buyers love imagining how they’ll make it their own.
So, whether it’s a cozy window nook perfect for a rainy day read or a backyard fire pit begging for marshmallow roasting, make those features pop. Because, let’s be honest, it’s these small but striking details that often steal the show!
Exterior Angles
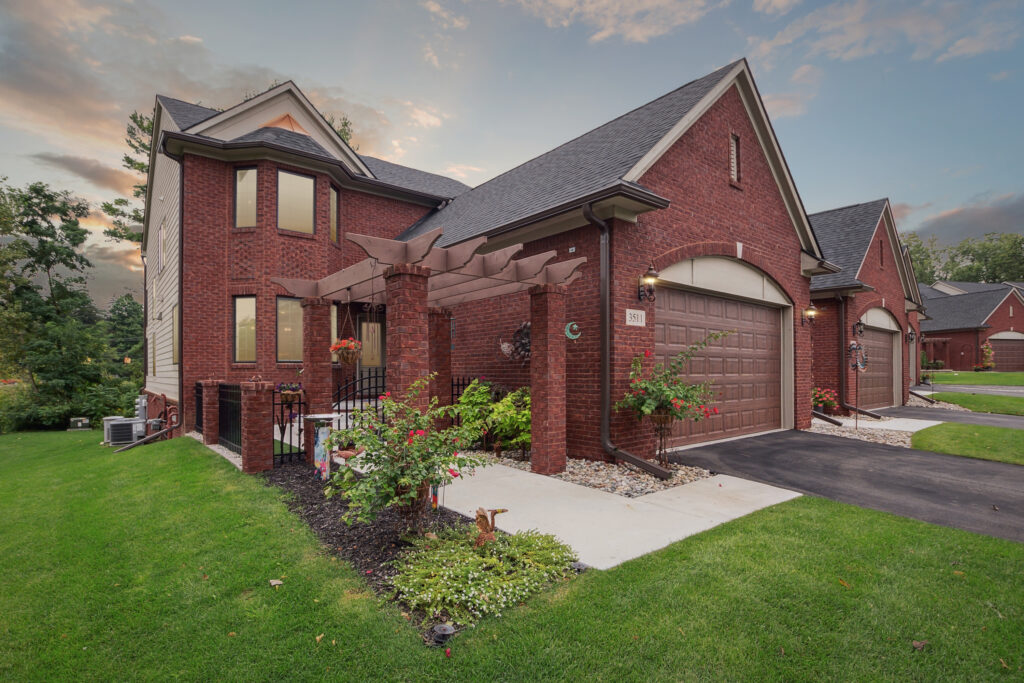
Let’s talk curb appeal—because first impressions are everything, right?
When it comes to nailing those exterior shots, you’ve got to think beyond the basic “stand in the driveway and click” approach. Start by playing around with your angles. Instead of shooting the house straight-on, try standing off to the side to give the image a bit more depth and personality. A little tilt can do wonders!
Timing is also key here. If you’re shooting in the middle of the day with the sun glaring down, you’re probably going to end up with harsh shadows and blown-out highlights. No one wants that. Early morning or late afternoon is your sweet spot. The light is softer, the shadows are gentler, and everything just looks a bit more magical—kind of like the house got a glow-up.
Oh, and don’t forget to pay attention to the surroundings. Is there a killer front yard with blooming flowers or a charming walkway? Include it! Got a tree that’s throwing some dappled sunlight onto the lawn? Work that into the frame. These little details can give the photo a welcoming vibe that screams, “Look at me, I’m your dream home!”
And for the love of all things real estate, make sure the lawn is mowed, the driveway is clear, and there aren’t any garbage cans lurking in the corner of your shot. Nobody wants a photo bomb from trash day!
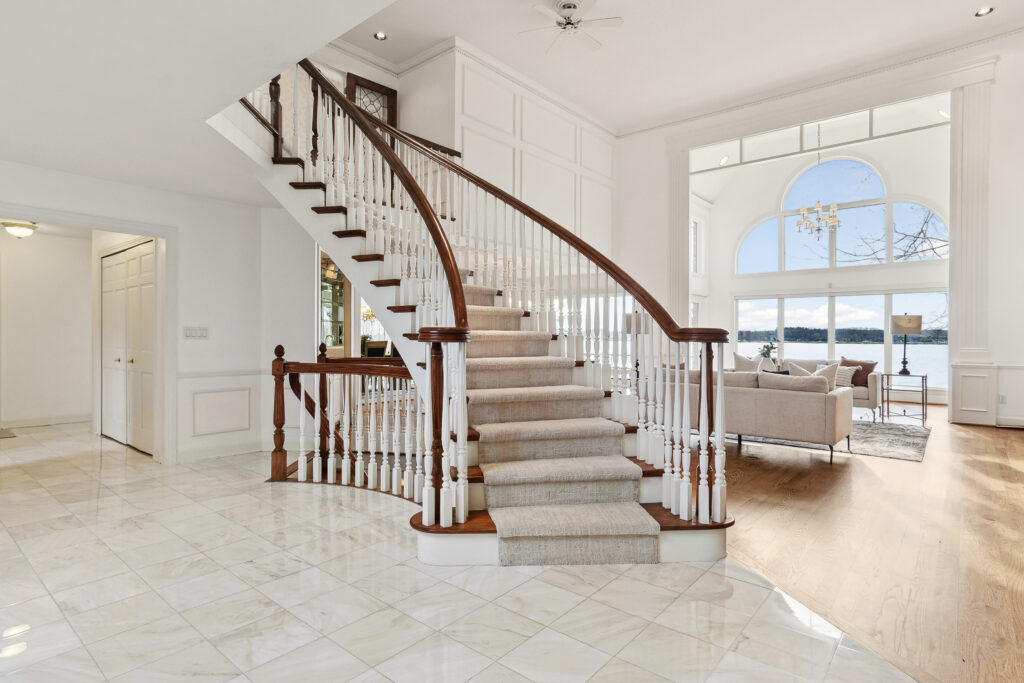
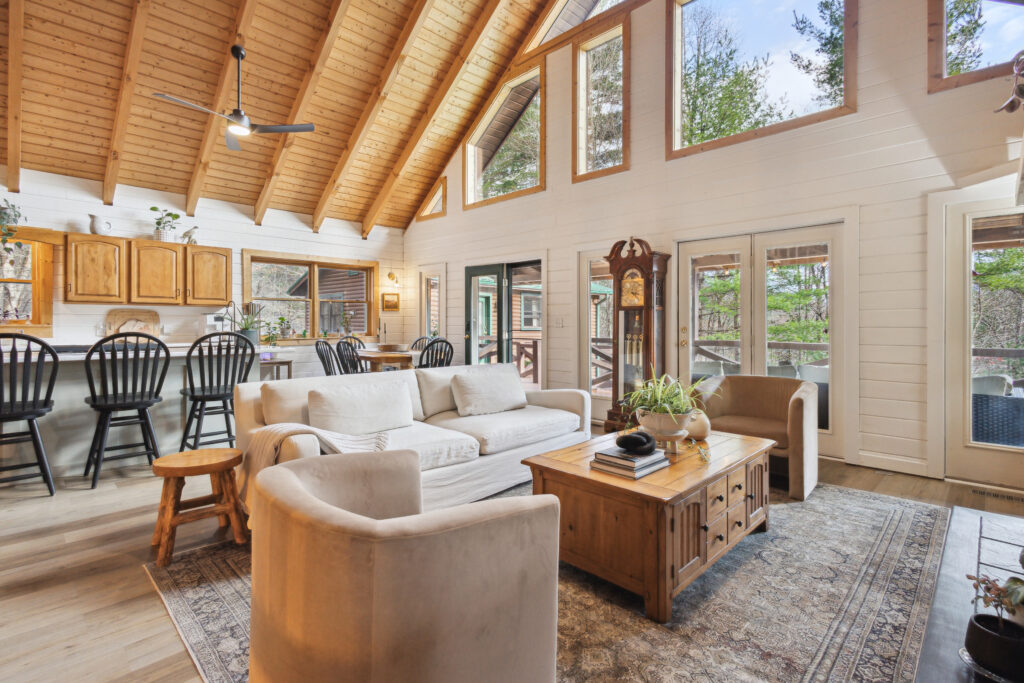
Vertical Shots for High Ceilings

High ceilings are like the VIPs of a home—they demand attention, and your job is to make them look fabulous.
When you’re working with a room that’s got that wow-factor height, ditch the horizontal shots and go vertical, my friend. Seriously, it’s the only way to do them justice.
Start by finding a spot that gives you the best view of the room’s towering feature. Maybe it’s those dramatic wooden beams or a chandelier that looks like it belongs in a movie set. Stand slightly off-center or near the base of the focal point and aim your camera upwards. This helps create that “OMG, this space is huge” vibe without making it feel like you’re just shooting straight up for no reason.
And let’s not forget those windows—if a room has giant ones that let in light like it’s a cathedral, you’ve struck gold. Try framing the shot so the natural light pouring in draws your eye up, showing off both the height and the airiness of the space. Bonus points if you can catch a little shadow play from the windows—nothing screams classy like that perfect balance of light and shadow.
Bottom line? Think big, shoot tall, and make those ceilings look like the star they are!
Angles for Capturing Lighting
Lighting can make or break a photo, and natural light? Oh, it’s the MVP.
The goal here is to make the light do all the heavy lifting for you. Start by paying attention to where it’s coming from. Is it streaming in through a big window, casting a warm glow on the floors? Or maybe it’s filtering through some trees outside, creating those cool shadow patterns? Either way, find the sweet spot where the light looks soft and inviting—not like you’re taking a picture of a solar flare.
Now, here’s the thing about light: it’s always moving. What looks dreamy in the morning might look like a crime scene at noon. Early morning and late afternoon usually serve up the good stuff—gentle, golden light that makes everything feel cozy and alive. Midday? Eh, not so much. Harsh light equals harsh photos, so save yourself the trouble and wait it out.
And don’t forget to show off how the light plays with the space. Maybe it’s highlighting that perfect reading nook or bouncing off a shiny kitchen island. These little lighting moments add drama and make the room feel alive. When in doubt, let the light guide you—because when it’s done right, it’s like a little spotlight on how amazing the space is.
Conclusion
And that’s a wrap, my friend! Real estate photography is all about nailing those angles, getting creative, and making every room look like it’s straight out of a magazine.
Just remember, potential buyers are glued to the photos—they’re spending about 60% of their time drooling over the images, while only 20% goes toward actually reading the listing. potential buyers spend a good chunk of their time—60%, to be exact—eyeing those gorgeous images, while only 20% is spent reading the listing description. So, your photos? They’ve got to pack a punch.
Whether it’s showing off the open flow of a space with a wide-angle shot, making unique details stand out, or capturing that dreamy natural light, every snap should tell a story. The best part? The more you practice, the more your skills will shine. So grab your camera, keep experimenting, and let your creativity lead the way. Soon enough, you’ll be that go-to person who makes buyers say, “Wow, this feels like home!”
Selling a property? Give us a call today and learn more about our professional photography services that can boost your property listing!
Also, explore our sister company for exclusive luxury listings you won’t want to miss. Don’t forget to tune into our new podcast for even more valuable insights!